

Salesforce Record Manipulation Using Amazon Alexa
At first, let us discuss about Amazon Alexa! So what is Amazon Alexa? Amazon Alexa, known simply as Alexa, is a virtual assistant developed by Amazon. It is easily available in the market, but it's costly. Even if, you can't afford one, you can simply download Amazon Alexa from the google play store or from the Apple App Store. The app looks like this :

Other than the Alexa app/device you would need an Amazon Developer Account. I hope all of you have an Amazon account. You can just go to this link: https://developer.amazon.com
And login using your Amazon credentials.
![]() Don't forget to check out: How to Use Amazon Lex in Salesforce?
Don't forget to check out: How to Use Amazon Lex in Salesforce?
I hope all of you have a Trailhead account. That is obviously needed as we need to connect the amazon account with Salesforce. You must have My Domain set into your trailhead account. To set your My Domain Go to Setup -> Enter My Domain in the quick find box and enter your domain name. After successfully setting your domain name copy the value that is after : Your domain name is <domain name>
Next, we will create a custom setting to store a voice code. A voice code can help identify the current user. The first time someone uses an Alexa skill with a voice code requirement, the user is able to set a four-digit code. You store the code in a custom setting in Salesforce.
Then, create a protected custom setting.
1. Enter Custom Settings into the Quick Find box, and then select Custom Settings.
2. Click New.
3. In the New Custom Setting Definition form, fill in:
-
- Label: Voice Code
- Object name: Voice_Code
- Setting Type: List
- Click Save.
4. In the Voice Code Custom Settings Definition page, click New in the Custom Fields table.
5. Choose type Text.
6. Click Next.
7. In the New Custom Field form, fill in:
- Field Label: Code
- Length: 60
- Field Name: Code
- Required: Check the box to require a value when saving a record.
- Click Next.
8. Click Save.
Next, follow instructions in this link: https://aws.amazon.com/premiumsupport/knowledge-center/create-and-activate-aws-account/
and create an AWS account. This will help us to connect Amazon and Salesforce.
Have Nodejs, ask-cli, aws-cli, github installed in your PC. Nodejs version must be 8.16.0 and ask-cli version must be 1.4.9. aws-cli does not have a version specification.
After completing the above steps you can actually integrate Salesforce with Alexa.
First, login to your AWS account. Then go to https://console.aws.amazon.com/console/home
1. Search for IAM
2. Click Users
3. Click Add User
4. Provide a username
5. For Select AWS Access Type, select Programmatic Access.

6. Click Next: Permissions.
7. On the Permissions page, select Attach existing policies directly. You add two policy types: IAMFullAccess and AWSLambdaFullAccess.
8. In the search box, enter AWSLambdaFullAccess and then check the box next to the policy that shows up. 
9. Now, click on Next: Tags
10. Click Next: Review at the bottom right.
11. Verify on the Review page that your two policies, IAMFullAccess and AWSLambdaFullAccess, are showing.
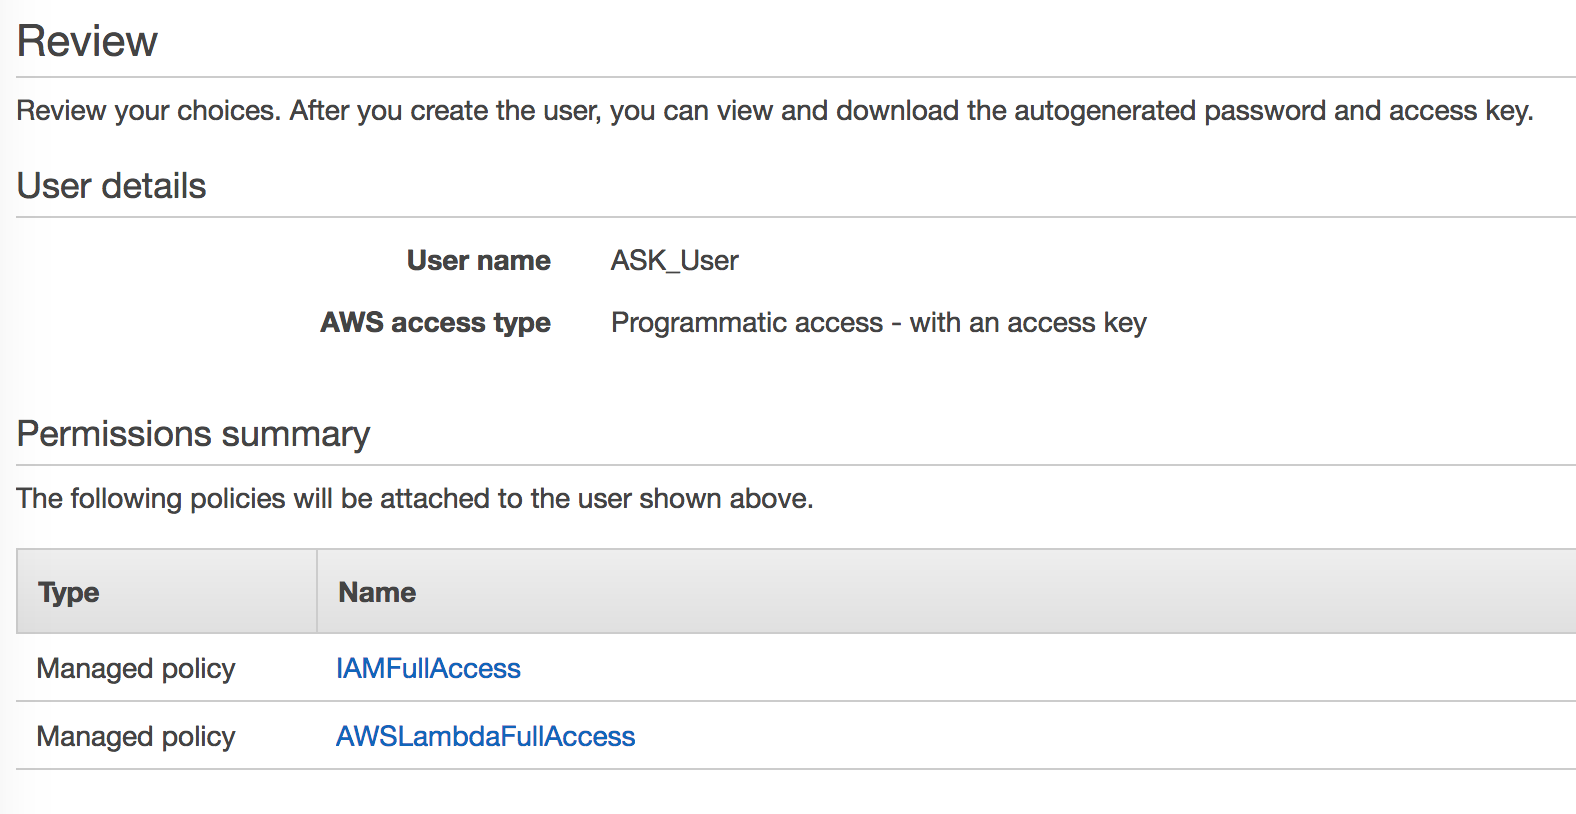
12. Click Create user.
13. On the Add user Success page, you can download a .CSV file containing the user’s Access Key ID and Secret access key, or you can copy them directly from the page. Click Show to see the secret access key. Write these down. If you lose these keys, don’t worry. You can always generate new ones in the future if you need them.
14. Click Close when you’ve saved the keys.
If you would have installed aws-cli successfully, then try the below command in the Command Prompt.
$ aws --version
It should show something like :
aws-cli/1.11.84 Python/3.6.2 Linux/4.4.0-59-generic botocore/1.5.47
Once you have completed the installation process, run the following command, using the access key ID and secret access key you copied from the previous step.
$ aws configure
AWS Access Key ID [None]: <Enter your access key ID>
AWS Secret Access Key [None]: <Enter your secret access key>
Default region name [None]: us-east-1
Default output format [None]: ENTER
Next, we need to install and setup ask-cli. For that, you need to install Nodejs version 8.16.0 first. Follow the below steps :
1. Go to https://nodejs.org/en/download/
2. Select the required version and install in your PC.
3. After successful installation, run the below command in Command Prompt.
$ node -v
It will show the version of the Nodejs.
4. Now, to install the ask-cli open command prompt as an Admin and enter the following command
$ npm install -g ask-cli@1.4.9 (For Windows Users)

$ sudo npm install -g ask-cli@1.4.9 (For Linux Users)
5. The first time you use ASK CLI, you must call the init command to initialize the tool with your Amazon developer account credentials.
$ ask init
6. Your browser then opens so you can log in to your Amazon Developer account.
7. In your browser, log in to your account.
8. Click OKAY to allow the ASK CLI to use your Amazon Developer account.
9. Close the browser window.
10. Back in your command prompt, answer the resulting prompts to create a new profile and choose a name. You can also use the default option by pressing Enter. Make sure to choose your default AWS profile that was set up in the previous step.
-------------------- Initialize CLI --------------------
Setting up ask profile: [default]?
Please choose one from the following AWS profiles for skill's Lambda function deployment.
(Use arrow keys)
❯ default
────────────── skip AWS credential for ask-cli
Now, it's the time to create a Skill and Lambda Function using the ASK CLI:
1. Go clone or download the following GitHub repository: https://github.com/alexa/skill-sample-nodejs-salesforce
2. Go to the directory where you downloaded the files and open a command prompt at the skill-sample-nodejs-salesforce/lambda/custom/ directory. Enter the following command to download necessary dependencies that deploy with our Lambda function:
$ npm install
3. With your command prompt, return to skill-sample-nodejs-salesforce/ by running the below command
$ cd ../../
4. Then run the following command to create the skill and Lambda function at one time.
$ ask deploy
-------------------- Create Skill Project --------------------
ask profile for the deployment: default
Skill Id: amzn1.ask.skill.<Skill ID>
Skill deployment finished.
Model deployment finished.
Lambda deployment finished.
5. Make sure to write down your Skill ID returned in the previous output. We use that often in the future steps.
Next, we must Update the Lambda Function to only respond to our Skill.
1. Modify the following line in skill-sample-nodejs-Salesforce/lambda/custom/constants.js by adding your Skill ID that was created earlier:
appId : process.env.SKILL_ID || '<SKILL ID HERE>'
2. Modify the following line by adding your domain name, including https:// at the front:
INSTANCE_URL : process.env.INSTANCE_URL || '<DOMAIN HERE>'
3. After modifying the constants.js file, save the file and exit.
4. Use the following command to update your Lambda function to include these latest changes:
$ ask deploy
Now, we will be using our Lambda Function to Call DynamoDB
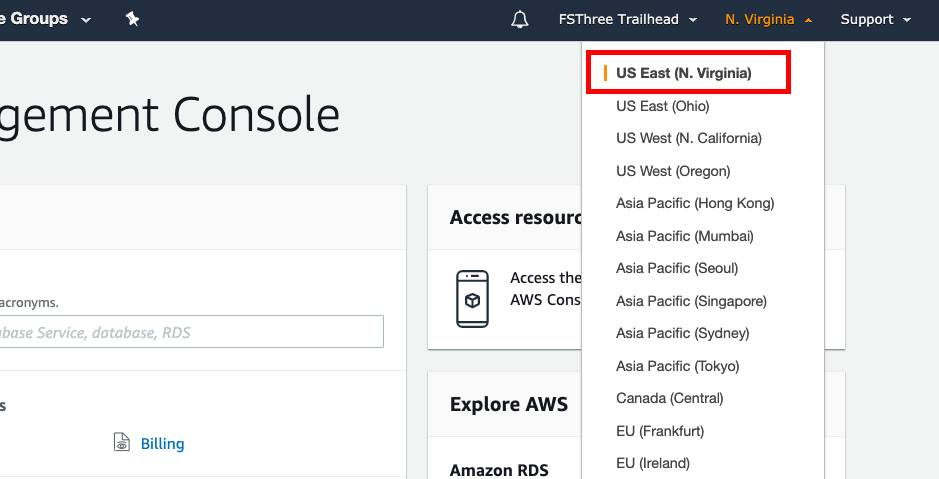
1. Previously, you created an AWS account. Use this account to log in to the AWS Console.
2. Make sure the region is set to US East (N. Virginia).
3. Type IAM in the AWS services search box at the top of the page and select IAM.
4. Click Roles.
5. Find the role that was created earlier. It should be called ask-lambda-Salesforce-Demo. Click it.
6. In the Permissions tab, click Attach policy.
7. In the search box, enter AmazonDynamoDBFullAccess and then check the box next to the policy that shows up.
8. Click Attach policy at the bottom right.
Now, we will see if the skill we have imported from the github is ready to e tested or not?
1. In order to test the skill before publishing, you need to enable testing on your skill. To do this, log in to the Amazon Developer Console.
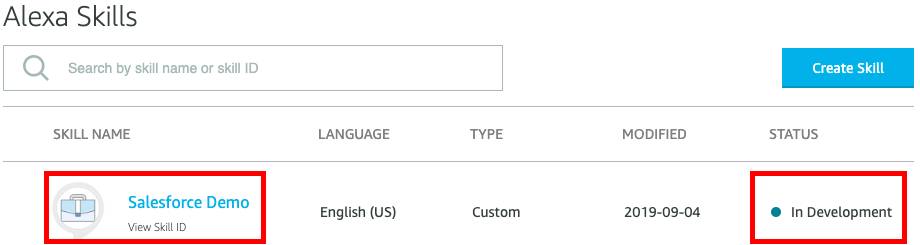
2. Then, directly jump to the page by substituting your Skill ID into the following URL (insert your ID in place of the bold text): https://developer.amazon.com/edw/home.html#/skill/<Skill ID>/en_US/testing
3. This takes you to your list of Alexa Skills ready to be tested. You should see a skill called Salesforce Demo. Its status should be In Development.
So congrats, you have made your first skill 
I know you can't wait to test the skill. Let's test the skill now, then we will go into modification.
So, we are going to run a basic test using the ask cli simulator. To do that follow the steps :
1. Run the below command in the command prompt.
$ ask simulate -l en-US -t "alexa, open Salesforce demo"
2. If you are using the correct version of ask-cli then the response will look like :
✓ Simulation created for simulation id: 0c857923-0753-43a5-b44c-ee2fca137aab◜
Waiting for simulation response{
"status": "SUCCESSFUL",
"result":
{...
3. Check for the output message to also see what Alexa would have said.
...
"outputSpeech": {
"type": "SSML",
"ssml": "<speak> A
Salesforce account
 is required to use this skill. I've placed more information on a card in your Alexa app. </speak>"
},...
So, we are getting this error because we have not connected this skill with any Salesforce account.
If you see an error message that says “Request to skill endpoint resulted in an error.”, try the simulate command again. This error may occur the first time a skill using DynamoDB is invoked due to creating a database table behind the scenes.
Now, we are almost ready setting up our PC to do Alexa Integration. Let's understand a bit of code now, later we will create the connected app.
Please open the file skill-sample-nodejs-salesforce/skill.json. This configuration file contains the skill name, description, sample utterances, image links for the skill, publishing information, and more. You can see all of these details in the Amazon Developer Console, too. We can give an overview of the skills here. Search for the "locales" part in the file, you will see "en-US" added inside it. You can add multiple language over there e.g "en-IN", as many languages as you add you have to add models also specific to that language. You can specify the models in the skill-sample-nodejs-salesforce-master\models folder. You can already see a file named en-US over there, you can add multiple files inside the folder.
When Lambda function is hit, the first thing it does is to call the skill-sample-nodejs-salesforce-master\lambda\custom\index.js, it creates some variable based on the packages from the package.json. Package.json is nothing but a file that holds various metadata relevant to the project. This file is used to give information to npm that allows it to identify the project as well as handle the project's dependencies.

Here, Alexa is variable imported from package.json. Rest of the variables are files inside the skill-sample-nodejs-salesforce-master\lambda\custom folder.
After importing all this it goes directly into the handler and there it imports some of the constants from the skill-sample-nodejs-salesforce-master\lambda\custom\constants.js file. Open the constants.js file to have a more clear understanding.
Now, alexa.registerHandlers() is called. It registers the handlers which are going to be called in the next steps. Finally, alexa.execute() executes the methods which are declared inside the handler. You can read more about the same in the link https://developer.amazon.com/en-US/docs/alexa/alexa-skills-kit-sdk-for-nodejs/migration-guide.html#migration-steps
![]() You need to check out this amazing blog about 'Salesforce Einstein Voice' here: Salesforce Einstein Voice – Stop typing and start Selling!
You need to check out this amazing blog about 'Salesforce Einstein Voice' here: Salesforce Einstein Voice – Stop typing and start Selling!
In order to set up your Salesforce Connected App, you need your Amazon Developer Account Linking Redirect URLs.
1. Go back to the Salesforce Demo Alexa Skill. If you need to, you can jump to it by entering https://developer.amazon.com/edw/home.html#/skill/<Skill ID>/en_US/configuration in your browser, replacing <Skill ID> with the skill ID you copied previously.
2. Click on Salesforce Demo.
3. Scroll to the bottom of the Build tab and click Account Linking.
4. Copy and save the three URLs that show next to Redirect URLs. They look like this:
- https://alexa.amazon.co.jp/api/skill/link/<Vendor ID>
- https://layla.amazon.com/api/skill/link/<Vendor ID>
- https://pitangui.amazon.com/api/skill/link/<Vendor ID>

4. Copy the URL's and keep it handy.
Now, let's make the connected app.
1. Launch your Trailhead Playground org and click the  icon at the top right, then select the Setup link.
2. Enter App Manager into the Quick Find box and select App Manager.
3. Click New Connected App.
4. In the New Connected App form, fill in:
-
- Basic Information:
- Connected App Name: Alexa Skill
- API Name: Alexa_Skill
- Contact Email: enter your email address
- API (Enable OAuth Settings):
- Check Enable OAuth Settings.
- For the Callback URL, use the Redirect URLs you saved from the previous step (see the screenshot below):
https://alexa.amazon.co.jp/api/skill/link/<Vendor ID>
https://layla.amazon.com/api/skill/link/<Vendor ID>
https://pitangui.amazon.com/api/skill/link/<Vendor ID> - In Available OAuth Scopes, select Access and manage your data (api).
- Click Add.
- In Available OAuth Scopes, select Perform requests on your behalf at any time (refresh_token, offline_access).
- Click Add
- Basic Information:

5. Click Save.
6. Click Continue.
7. Click App Manager again. Locate your newly created Alexa Skill and click the dropdown arrow on the far right. Select View.
8. Copy and save the Consumer Key and the Consumer Secret (click the Click to reveal button to see the secret key). You need this shortly.
Now, we will update our skill to link to our Salesforce Org
1. Go back to the ASK CLI. Enter the following command and fill out the resulting entries using your Connected App settings. Note that the Default Access Token Expiration Time In Seconds field needs to be provided for this skill. Set this to something less than your Salesforce session timeout value.
$ ask api create-account-linking -s <Skill ID>
? Authorization URL:  https://login.salesforce.com/services/oauth2/authorize
? Client ID:  <Your Connected App’s Consumer Key>
? Scopes(separate by comma):  api,refresh_token
? Domains(separate by comma):
? Authorization Grant Type:  AUTH_CODE
? Access Token URI:  https://login.salesforce.com/services/oauth2/token
? Client Secret:  [hidden] <Your Connected App’s Consumer Secret>
? Client Authentication Scheme:  REQUEST_BODY_CREDENTIALS
? Optional* Default Access Token Expiration Time In Seconds: 3600
Account Linking created successfully.
Now, we will test the linking.
1. Go to your Alexa companion application on your device/phone (or go to https://alexa.amazon.com) and sign in using your Amazon Developer account.
2. If you don't have an Echo device associated with your account, you can use Echosim.io, a community project that allows you to use an Echo in your web browser. Once signing in with your Amazon Developer account credentials, the Echosim device shows up in your Alexa app.
3. Click Skills.
4. Click Your Skills.
5. Click Dev Skills.
6. Find the Salesforce Demo skill and click it.
7. Click Settings.
8. Click Link Account.

9. Your browser or device then opens a window to the Salesforce login screen.
10. Enter your Trailhead Playground user credentials, and you should see a page letting you know that your skill was successfully linked.
At this point, the skill is ready to be tested end to end! Let’s make sure everything is working as expected by testing on your Alexa-enabled device.
1. Try out the following request: “Alexa, open Salesforce Demo.”
2. Alexa welcomes you and asks you to create a voice code.
3. Choose a four-digit code and speak it back.
4. Alexa creates and stores the code.
If while using the skill, you continue to experience errors, try looking at your Amazon Cloudwatch logs.
1. Log in to the AWS Console and type CloudWatch in the AWS services search box at the top of the page and select CloudWatch.
2. Click Logs in the menu.
3. Click your log group named /aws/lambda/ask-custom-AlexaSalesforceDemo-default.
4. Click the log stream with the most recent Last Event Time. This should be the top item.
5. From here, you see individual log statements from each invocation of your Lambda function. The error messages visible here may give you guidance to specific areas of the skill that may need to be reconfigured or adjusted.
6. If you make changes to any of the code files, such as skill-sample-nodejs-salesforce/lambda/custom/constants.js, don’t forget to run the "ask deploy" command to push your changes back out to Lambda.
Congratulations! You’ve successfully built and tested a private Alexa skill that is connected to a Salesforce org


